Trailer TIRES & WHEELS KNOWLEDGE & TIPS
Replacing the wheels & tires on your trailer shouldn’t be a difficult task, but then you hear terms like load range, bias, radial, pilot diameter & offset being thrown around & maybe it isn’t as easy as you thought it was. Well, we’re here with trailer tire & wheel facts to help take some of the mystery out of replacing your trailer’s tires & wheels! Having a better understanding helps eliminate the fear of buying the incorrect parts.
WHEELS (Rims)
Alright, let’s start off with the wheels! We are going to cover bolt pattern, pilot diameter, inset & offset, & rim contours/bead profiles.
Bolt Pattern
The bolt pattern, sometimes called the bolt circle or lug pattern, consists of 2 numbers. The first number tells us how many bolt holes there are on the wheel. The second number tells us the diameter of the circle created by the bolt holes. For example, a wheel with a 6 on 5.5″ bolt pattern has 6 bolt holes that are set on a circle with a 5.5″ diameter.
There are several methods used to measure the bolt pattern. There are also a few tools available to measure the bolt pattern. If you don’t have access to one of these tools, all that you need is a ruler or tape measure to determine the bolt pattern.
If there is an even number of bolt holes, you can measure the distance between two bolt holes that are directly across from each other center of hole to center of hole.
.jpg)
If there is an odd number of bolt holes, you can use the same method, but you must measure the distance from the center of one bolt hole to the mid point between the 2 bolt holes directly across. Since there isn’t a bolt hole directly opposite of the first hole, it is more difficult to get a precise measurement. You can also measure from the center of one bolt hole to the center of the pilot hole & multiply that number by 2.
.jpg)
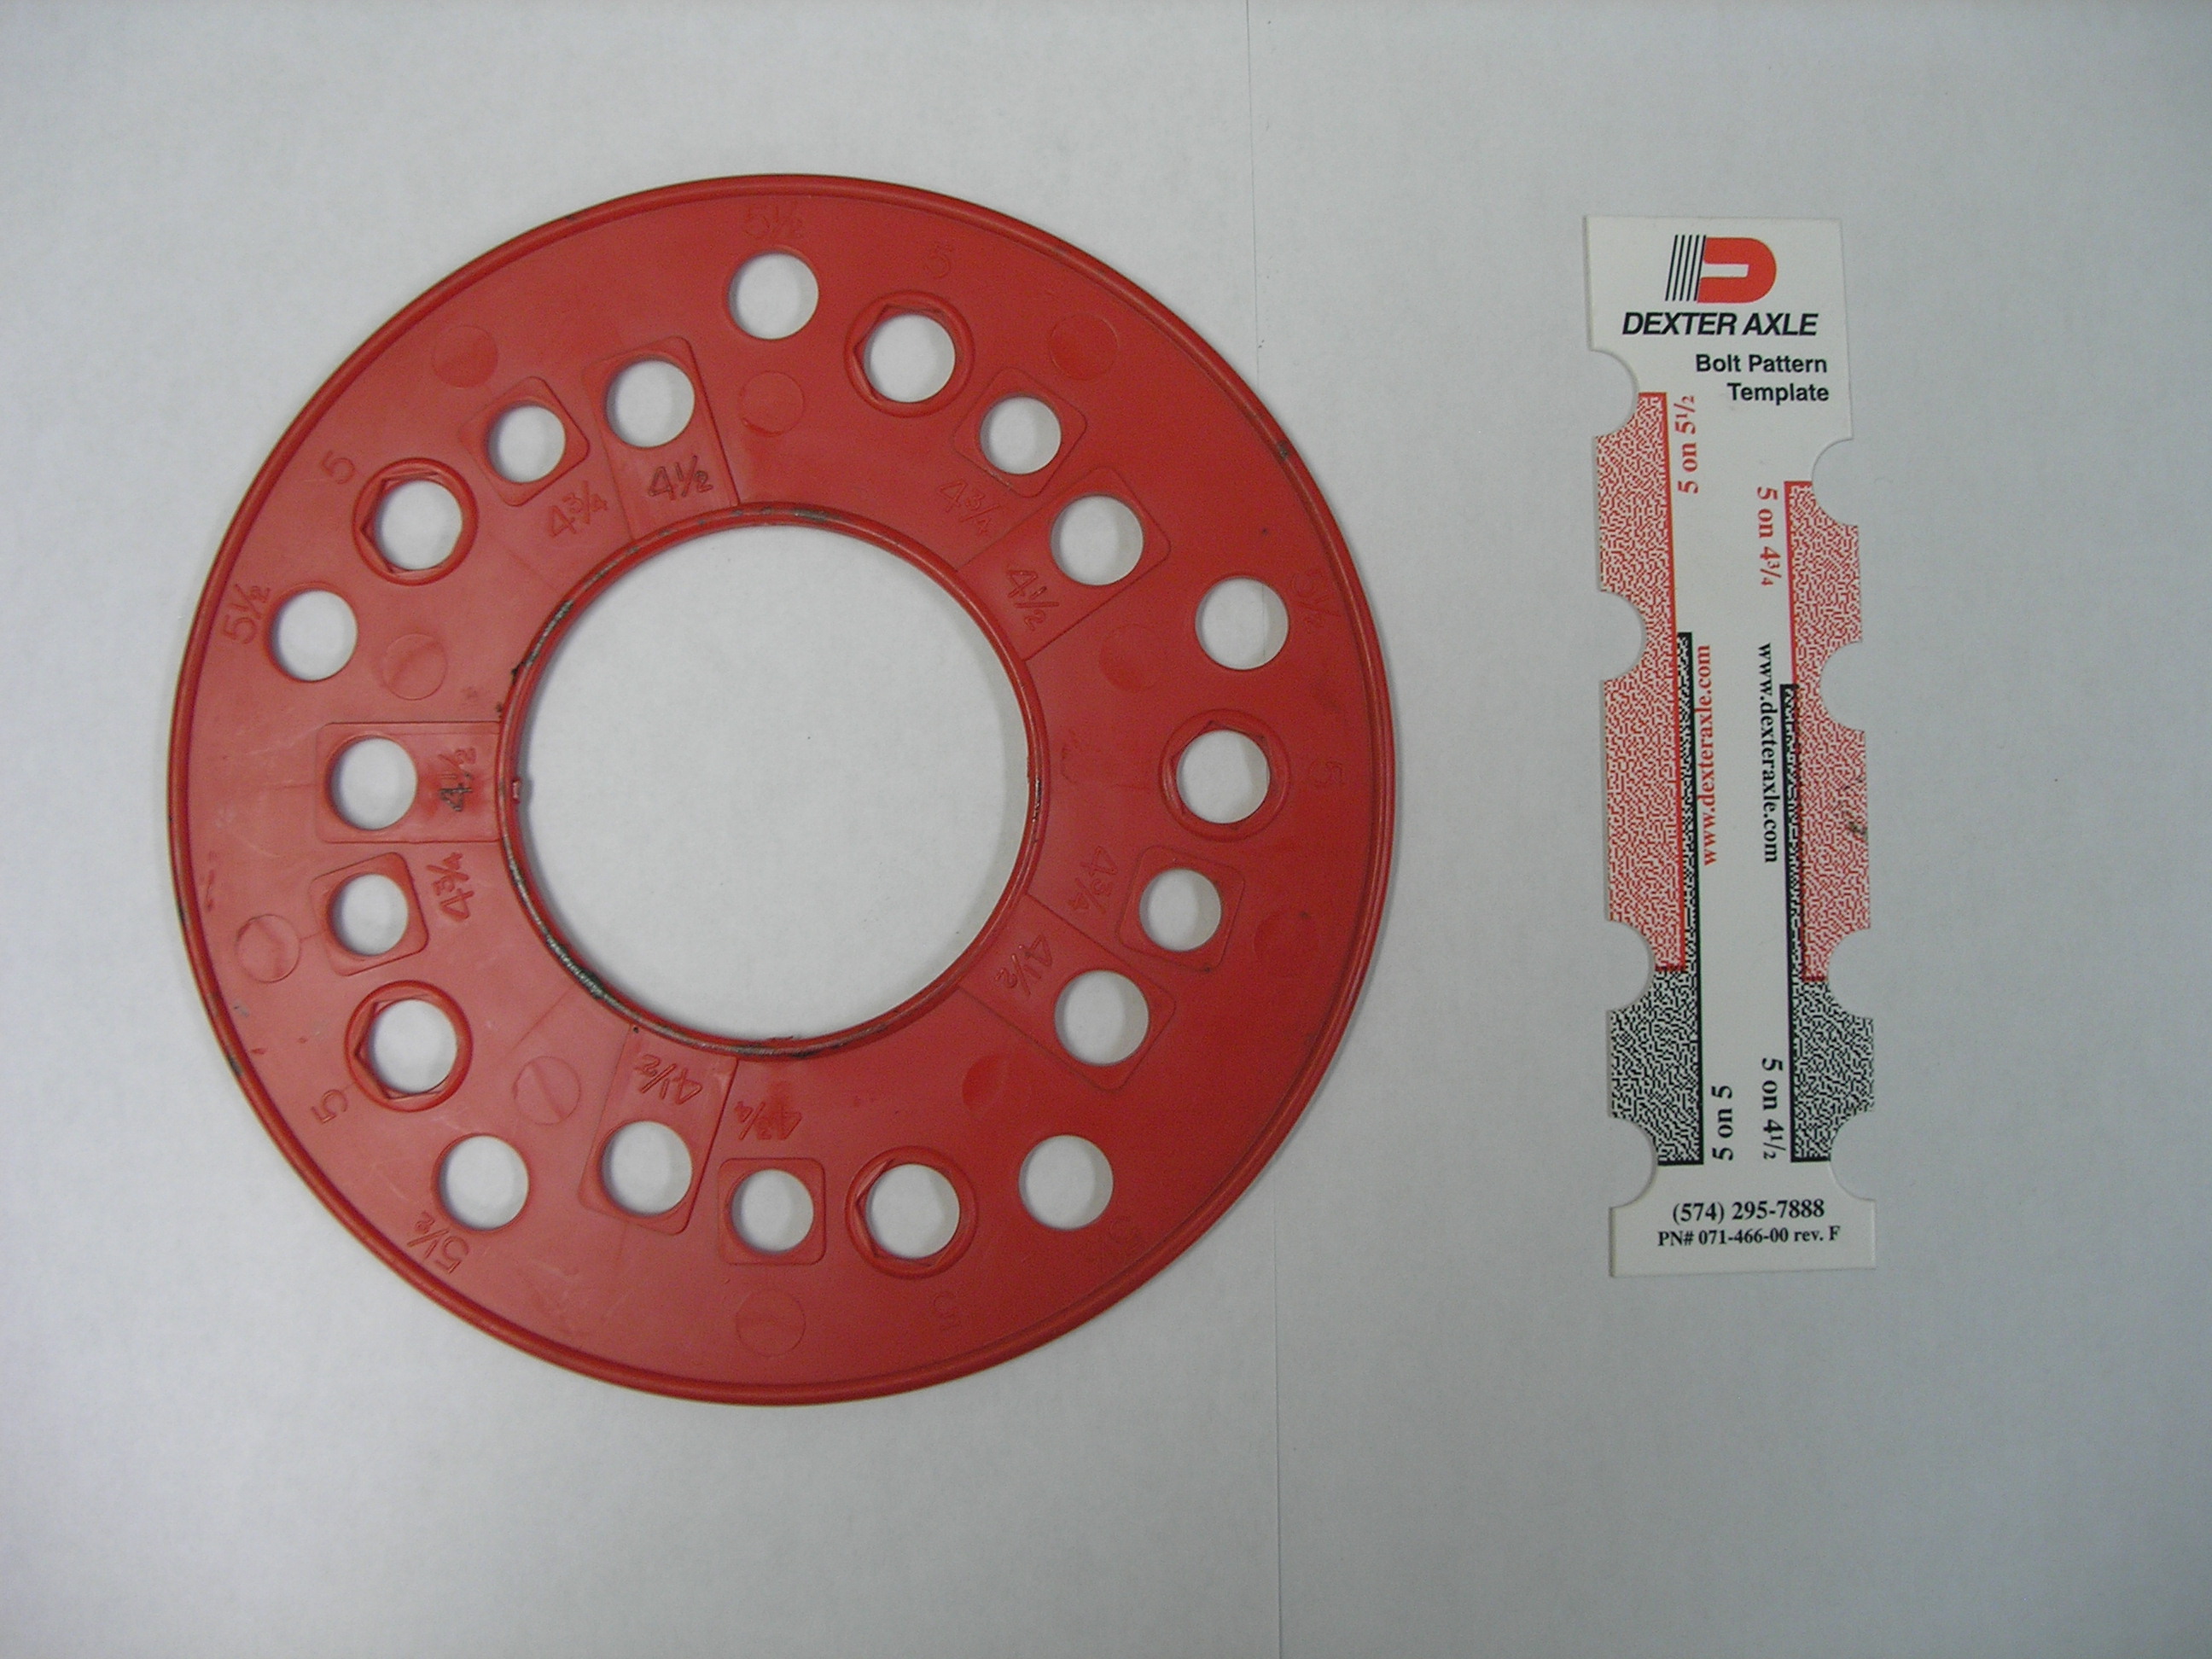
You can get a more precise measurement by measuring the distance from the center of one bolt hole to the center of the bolt hole directly next to it.
%202.jpg)
5 on 4 1/2″ = distance of 2-5/8″
5 on 4 3/4″ = distance of 2-3/4″
5 on 5″ = distance of 3″
5 on 5 1/2″ = distance of 3-1/4″
Pilot Diameter
The pilot diameter refers to the diameter of the hole in the center of the wheel. The pilot diameter comes into play when you talk about hub-centric vs. lug-centric wheels. A hub-centric wheel centers itself on the hub & a lug-centric wheel centers itself when the lug nuts are tightened to the correct torque specification. A hub-centric wheel uses flange nuts or flat backed nuts & a lug-centric wheel uses cone nuts. If you are replacing lug-centric wheels, the pilot diameter needs to be greater than or equal to the diameter of the hub. If you are replacing hub-centric wheels than you will need to match the pilot diameter and hub diameter.
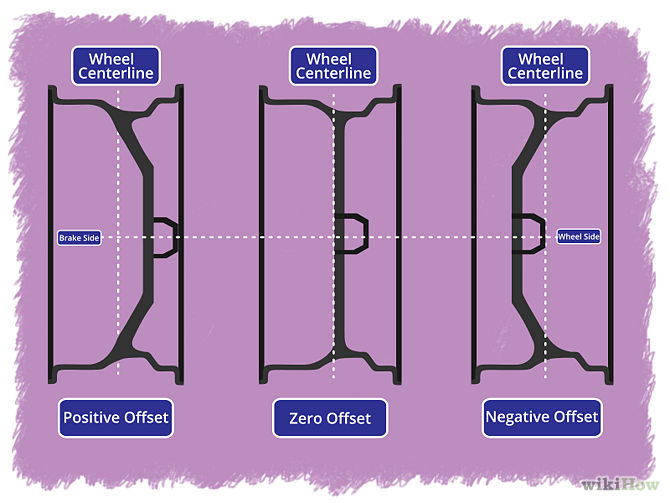
Offset
The offset is the distance from the centerline of the wheel to the mounting surface of the wheel. A wheel that’s mounting surface is equal distance from the rear lip of the wheel to the front lip has zero offset. Inset is a positive offset & outset is a negative offset. With an inset wheel, the wheel will be closer to the suspension & could result in some clearance issues. With an outset wheel, the wheel will be further away from the suspension & could possibly sit past the fenders.
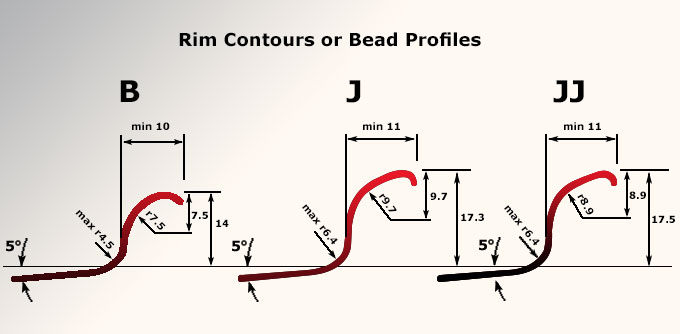
Rim Contours/Bead Profiles
This is a tough one because bead profiles are actually a very complex & complicated topic. The rim contour/bead profile refers to the shape of the wheel where the tire meets the bead. The bead profile should be stamped on the wheel along with the wheel size. With trailer wheels you will typically see “JJ” & “K” bead profiles, but you may see others as well. The differences between some bead profiles are very small, but can have a great effect on the fitment of the tires on the wheels. With that said, the most important thing to know about bead profiles is that you should always stick with what you already have (as long as there were no issues) or go off of the wheel size on the VIN plate of the trailer.
.
.
TIRES
Measuring Tires
Let’s talk about measuring a tire. This is really easy because tire manufacturers stamp the size directly on the sidewall of every tire! All that you need to know is how to read the size. There are several different methods for writing tire sizes, but you will only commonly see it 2 ways:
Metric
This format offers the most amount of information. It includes the application type, section width, aspect ratio, tire construction, rim diameter & load range.
Example: ST225/75D15 LRD
Numeric
This format is more common when writing small trailer tire sizes. The information included is the section width, rim diameter & load range.
Example: 5.30 x 12 C or 5.30-12 C
– Application type indicates the intended use for the tire. The numeric format does not include the application type, but the metric format does.
– ST: “Special Trailer” – Intended to be used on boat or utility trailers.
– P: “P-Metric” – Intended to be used on passenger vehicles – cars, vans, SUVs, or light duty trucks. These are not intended to be used on trailers.
– LT: “Light Truck-Metric” if placed at the beginning of the tire size – Intended for trucks or other vehicles that are capable of hauling heavy loads. If placed at the end of the tire size, there are three different meanings. “Numeric” – Intended for carrying heavy cargo & pulling trailers, “Flotation” – Intended for driving on sand or loose dirt, or “Wide Base” – If referring to a tire for 16-1/2″ diameter wheel.
Note: As stated above, passenger vehicle tires are not intended to be used on trailers. Passenger vehicle tires are designed for handling and turning; whereas, trailer tires are engineered for traveling in a straight line. Load ranges & capacities are not relatable between different tire applications.
Section width is the width of the tire measured across the tread.
– Metric Format: this will be a 3 digit number following the application type. This distance is measured in millimeters.
Ex: ST225/75D15 LRD – The section width is 225 millimeters
– Numeric Format: the first set of numbers indicates the section width in inches.
Ex: 5.30 x 12C – The section width is 5.30 inches.
Aspect ratio is the ratio of the tire height & width.
– Metric Format: This is the 2 digit number following the section width & slash. Since the aspect ratio is 75, the section height is 75% of the section width, which on our example was 225 millimeters. 225 x .75 = 168.75 millimeters. To convert that to inches multiply 168.75 x 0.0394. The section height is 168.75 millimeters or approximately 6.65 inches.
Ex: ST225/75D15 LRD – The aspect ratio is 75. Meaning the section height is 75% of the section width.
Internal construction informs us of how the tire is made. You will typically see or “R” or “D” constructions when talking about trailer tires. We will get into more details about this later.
R: “Radial”
D: “Diagonal”, more commonly referred to as “Bias”
Ex: ST225/75D15 LRD – This is a Diagonal or Bias constructed tire
Wheel diameter obviously refers to which size wheel the tire can be mounted on.
– Metric Format: this will be a 2 digit number following the internal construction.
Ex: ST225/75D15 LRD – This tire can be mounted on a wheel with a 15″ diameter
– Numeric Format: the second set of numbers indicates the wheel diameter.
Ex: 5.30 x 12 C – This tire can be mounted on a wheel with a 12″ diameter
Load range identifies how much load a tire is designed to carry. We will get into more details on this a little later.
– Metric Format: this will be at the very end of the tire size.
Ex: ST225/75D15 LRD – This tire has a load range D
– Numeric Format: this will be at the very end of the tire size.
Ex: 5.30 x 12 C – This tire has a load range C
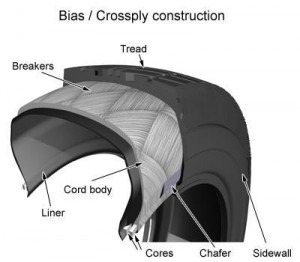
Bias vs. Radial – What’s the difference?
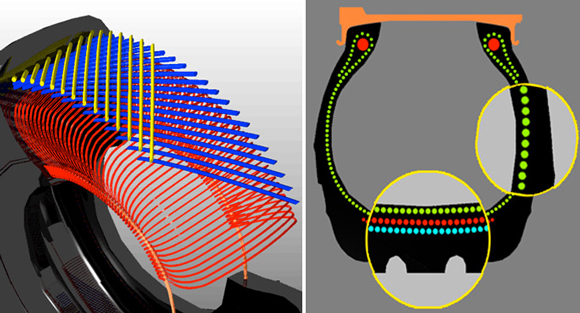
Bias tires are constructed of nylon belts that run diagonally, which is what the “D” stands for in the tire size stamping – “Diagonal”. The belts typically run between a 30° to 40° angle. This design allows for the entire body of the tire to flex easily, which offers a smooth ride on rough surfaces, but also causes less control & traction at higher speeds. The higher fuel consumption & more rapid wear compared to radial tires is offset by a lower cost.
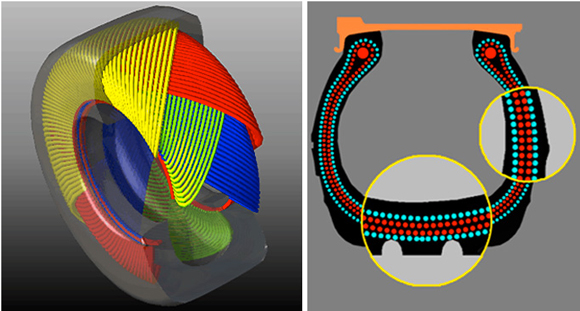
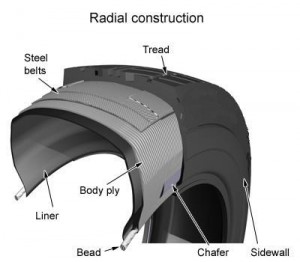
Radial tires are constructed with steel belts of the tire running at a 90° angle of the tread centerline from bead to bead. There are also stabilizer belts directly beneath the tire’s tread. This design allows the tread & sidewall to function as two independent features. This allows for better traction, distribution of pressure & a larger footprint. While radial tires offer longer lasting tread, better handling & reduced fuel costs, they also come with a higher price tag.
Load Ranges
The load range identifies how much load the tire is designed to carry at its pressure rating. Load ranges are now identified by a letter, with the strength of tire increasing as you ascend alphabetically. Before the industry began using load ranges, they used ply ratings. Early ply ratings stated the actual number of casings, whereas now they indicate an equivalent strength of the early ply ratings. Higher rated tires can carry heavier loads & withstand higher inflation pressures.
| Load Range | Ply Rating | Maximum Pressure |
| B | 4 | 35 psi |
| C | 6 | 50 psi |
| D | 8 | 65 psi |
| E | 10 | 80 psi
|
Now that you are armed with all of the necessary information to confidently buy replacement tires & wheels for your trailer, take a look at our selection of wheels, tires, & mounted wheel assemblies!