surge brake troubleshooting
THINK SAFETY!!
Don’t attempt working on your brakes if you aren’t experienced with brake systems. These troubleshooting tips assume that a person is familiar & equipped with jacking & supporting safety stands, brake tools, seal & bearing inspection techniques, shoe, drum, rotor inspections, & knows how to adjust, fill & bleed brakes.
–
AUTOMOTIVE HYDRAULIC BRAKE SYSTEMS
The car that you drive has hydraulic brakes. The brakes in your car consist of a “pump” (master cylinder) that you operate with your foot (brake pedal) connected by brake line tubing to a hydraulic cylinder (wheel cylinder) that pushes the brake shoes against the brake drum or disc brake caliper & rotor. The harder you push the pump with your foot, the more pressure you generate, thus the harder the brakes shoes are forced against the rotor or drum to stop you. These systems use brake fluid to do the work. If you would like to look at specific surge brake related parts, please click here to visit our Surge Brake section.
–
TRAILER SURGE BRAKE HYDRAULIC SYSTEMS
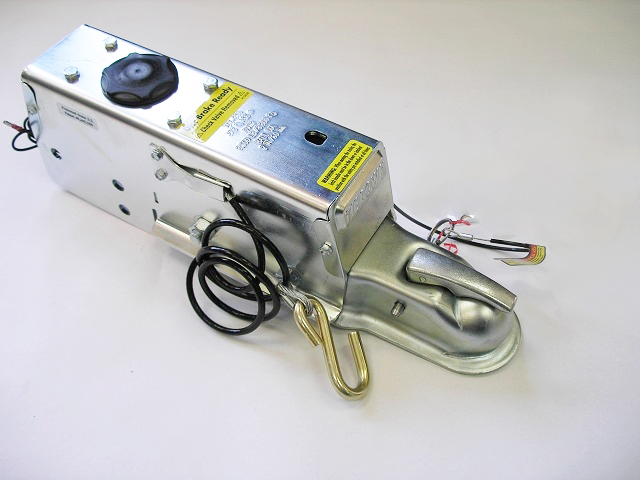
Typical Surge Brake Actuator
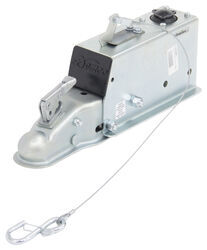
Surge Brakes on a trailer are also hydraulic brakes and work very much the same-with one difference. In a trailer surge brake system, the “pump” is located on the trailer-as part of the hitch assembly. This special sliding hitch assembly is called a surge brake actuator. It has a master cylinder built into it, but instead of using your foot to operate it, it uses the weight & the momentum of the trailer to do the pumping.
Above is a rear view showing a Master Cylinder & Outlet Port (top). This heavy duty unit shows that shock absorbers on the bottom prevent the slide from jerking front to back during stop & go movements.
Here’s how it works: Picture the truck & trailer traveling down the road at say….45 mph. The truck & trailer are traveling at the same speed, & the truck is “pulling” the trailer. When you apply your brakes in the truck to slow down, the truck is no longer pulling the trailer, and in fact the opposite occurs – the trailer now tries to “push” the truck with a surge of force (thus the name “surge brake”). This energy causes the surge actuator to slide, or “compress”. This compression operates the master cylinder, causing it to build brake fluid pressure. The harder you brake the tow vehicle, the harder the trailer tries to “push” the truck. The harder the trailer tries to push the truck, the more pressure the surge actuator builds up. The more pressure created, the harder the trailer brakes work. Even though the brakes on the trailer are not connected directly to the brake pedal in your truck, what you do with your foot in the truck is indirectly telling the trailer brakes what to do.
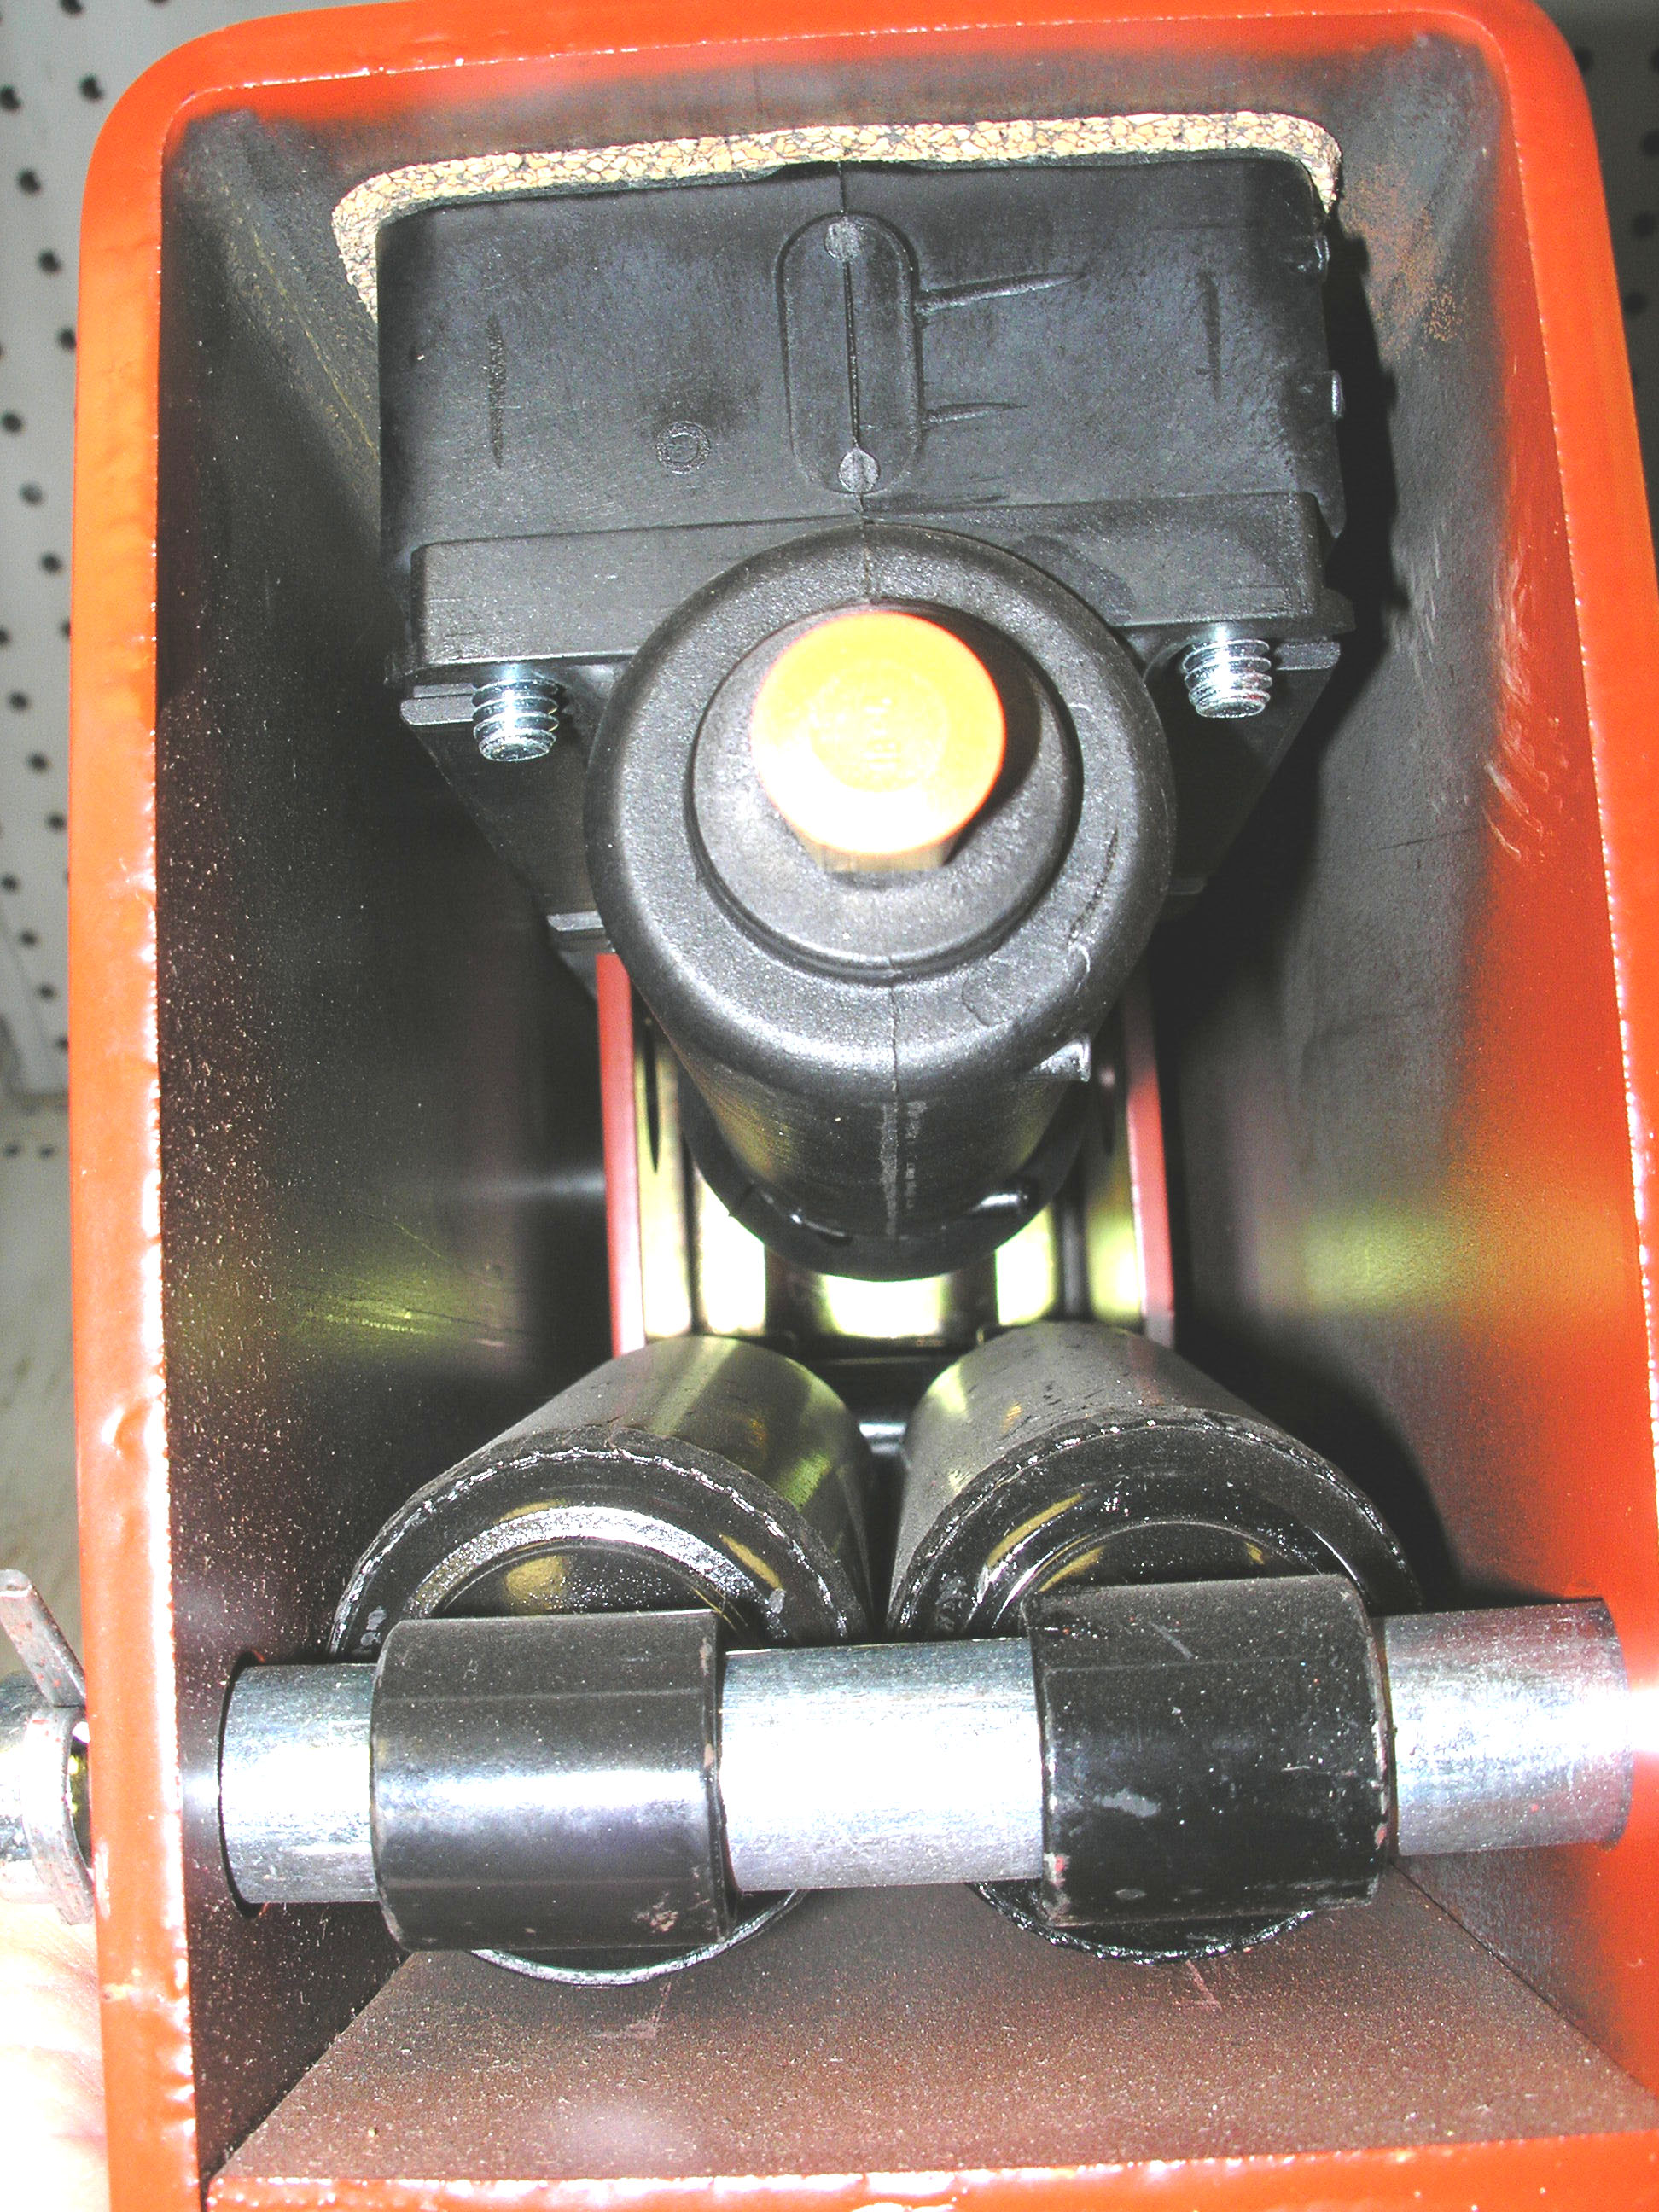
There is a restriction orifice built into a surge brake system. Its job is to dampen the response of the trailer brakes, and here’s why: Let’s say you were towing a trailer downhill & were applying steady brake pressure on the truck brakes to maintain speed (to prevent the rig from gaining downhill speed). The trailer is “pushing” against the truck-causing the trailer brakes to apply. Now the trailer wants to slow down, but in the process of doing so, it causes the truck to begin “pulling” the trailer again & the brakes on the trailer release. The minute the trailer brakes release, the trailer begins pushing on the decelerating truck again, causing the brakes to apply. This on-off-on-off-on-off pulsing trailer brake application is not desirable. The restriction orifice dampens the on-off pulsing effect by slowing down the travel of brake fluid from master cylinder to wheel cylinder & back. Many people don’t know the orifice is there, or don’t understand its purpose. We have surge brake actuators & associated parts in our parts department.
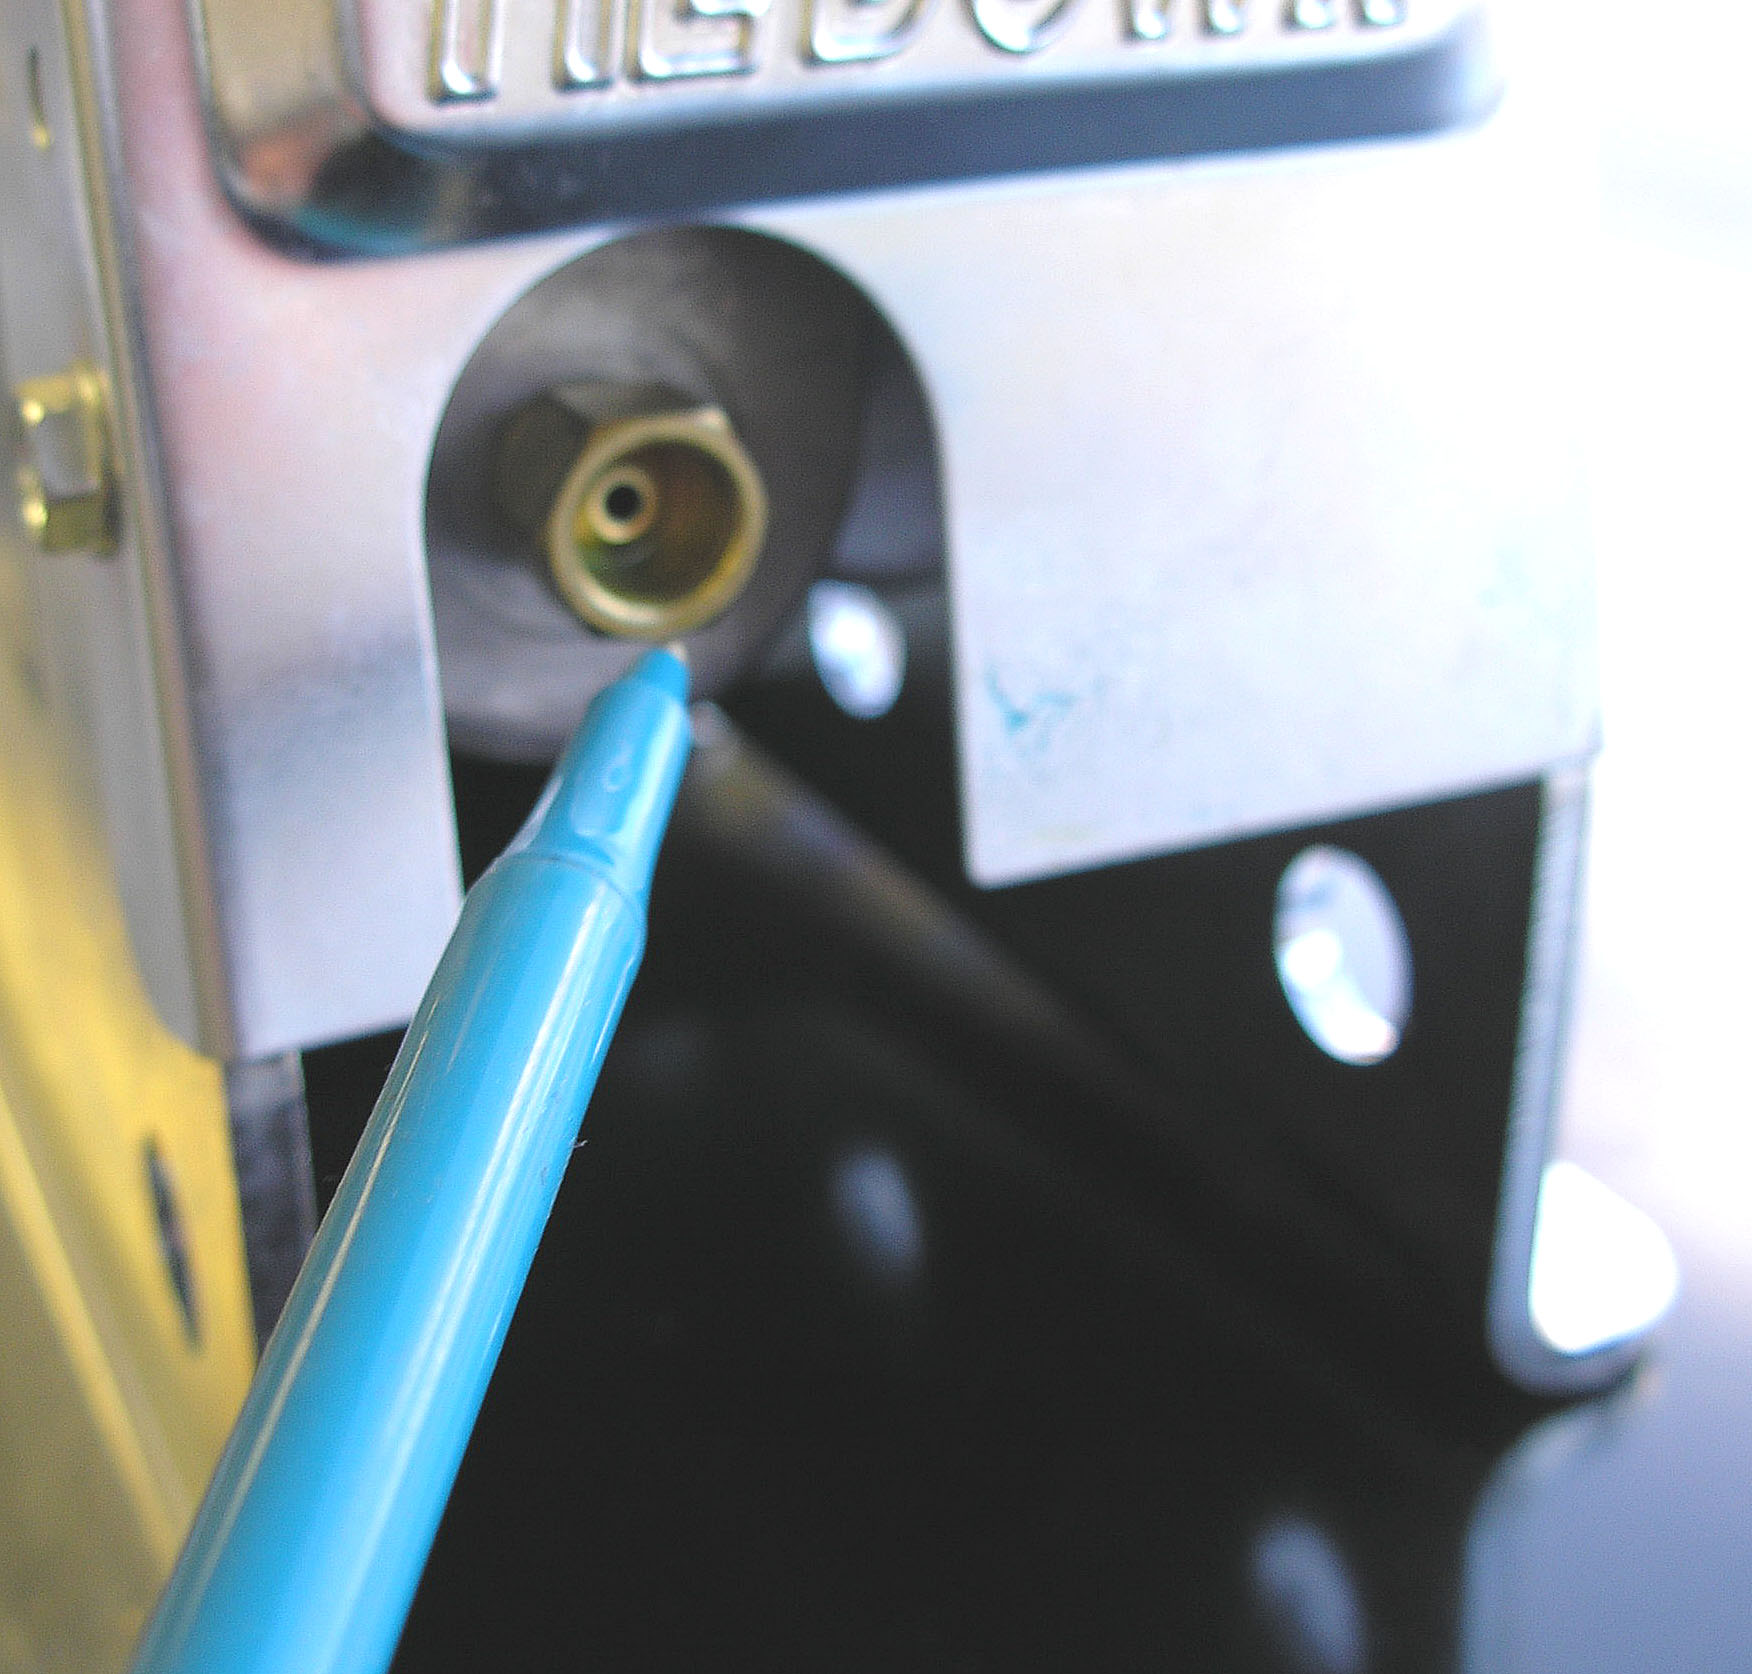
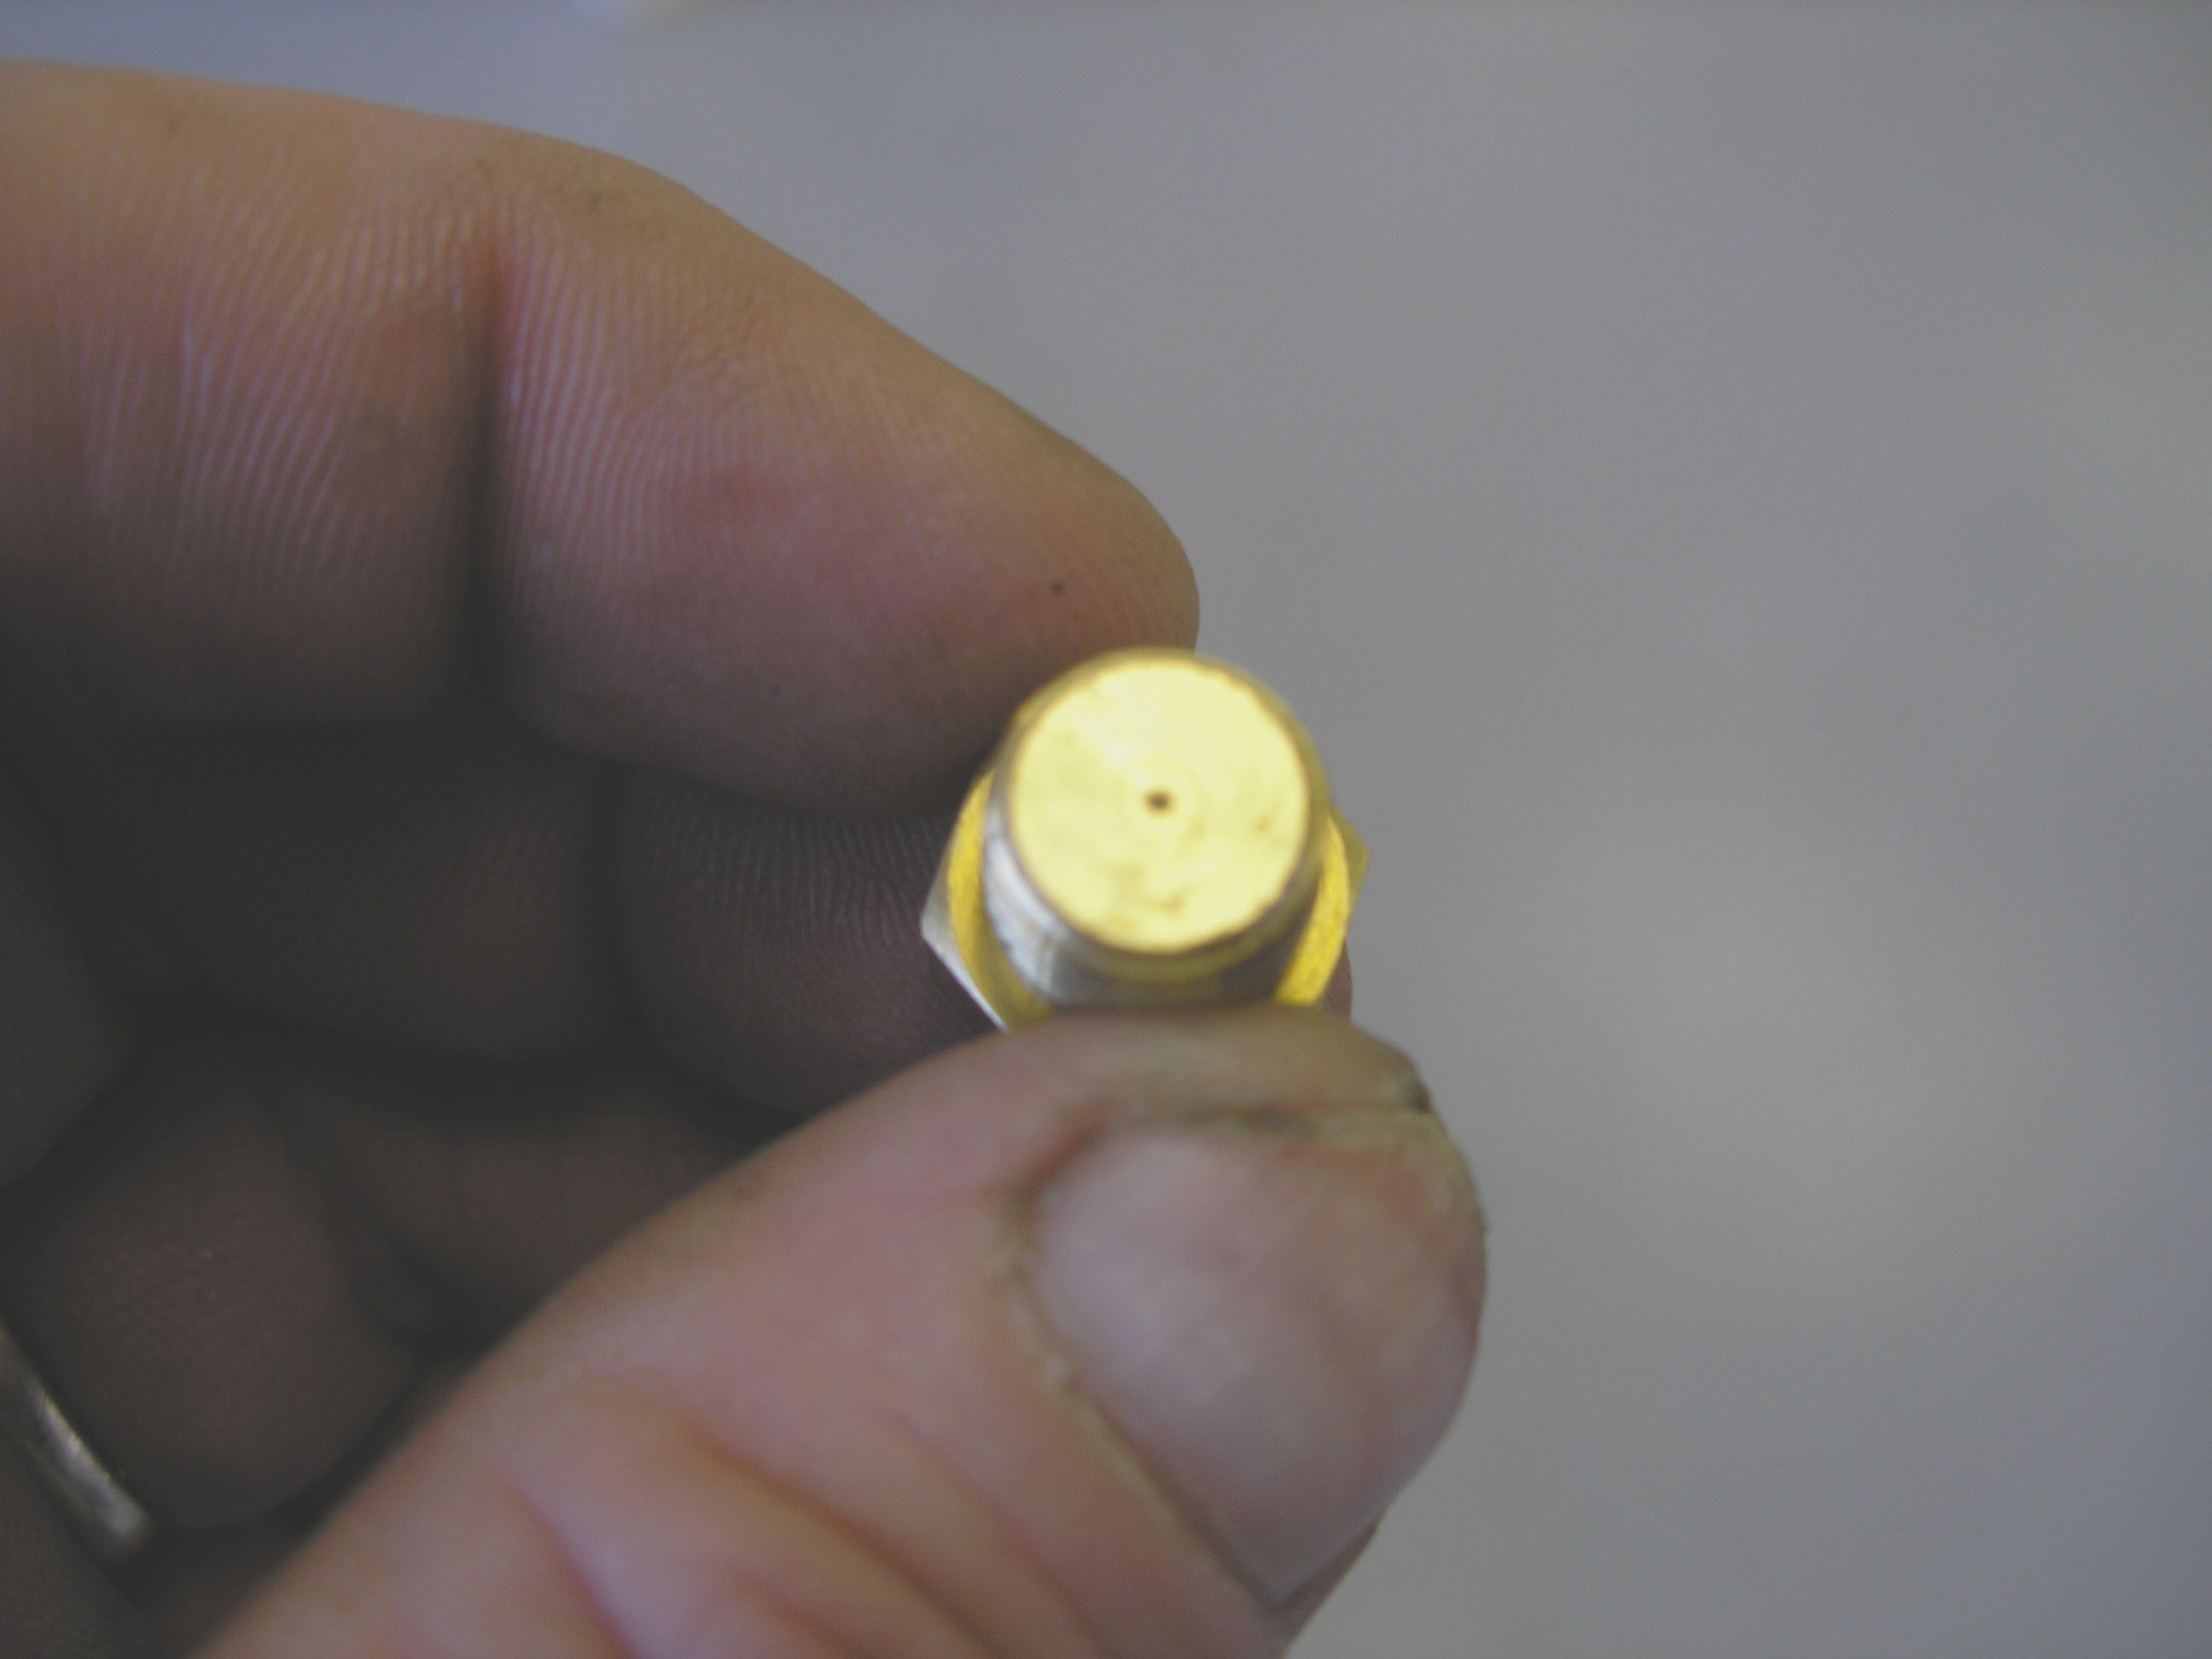
(Left pic) Shows a typical orifice location || (Right pic) Shows how small the orifice is to keep the brake fluid clean
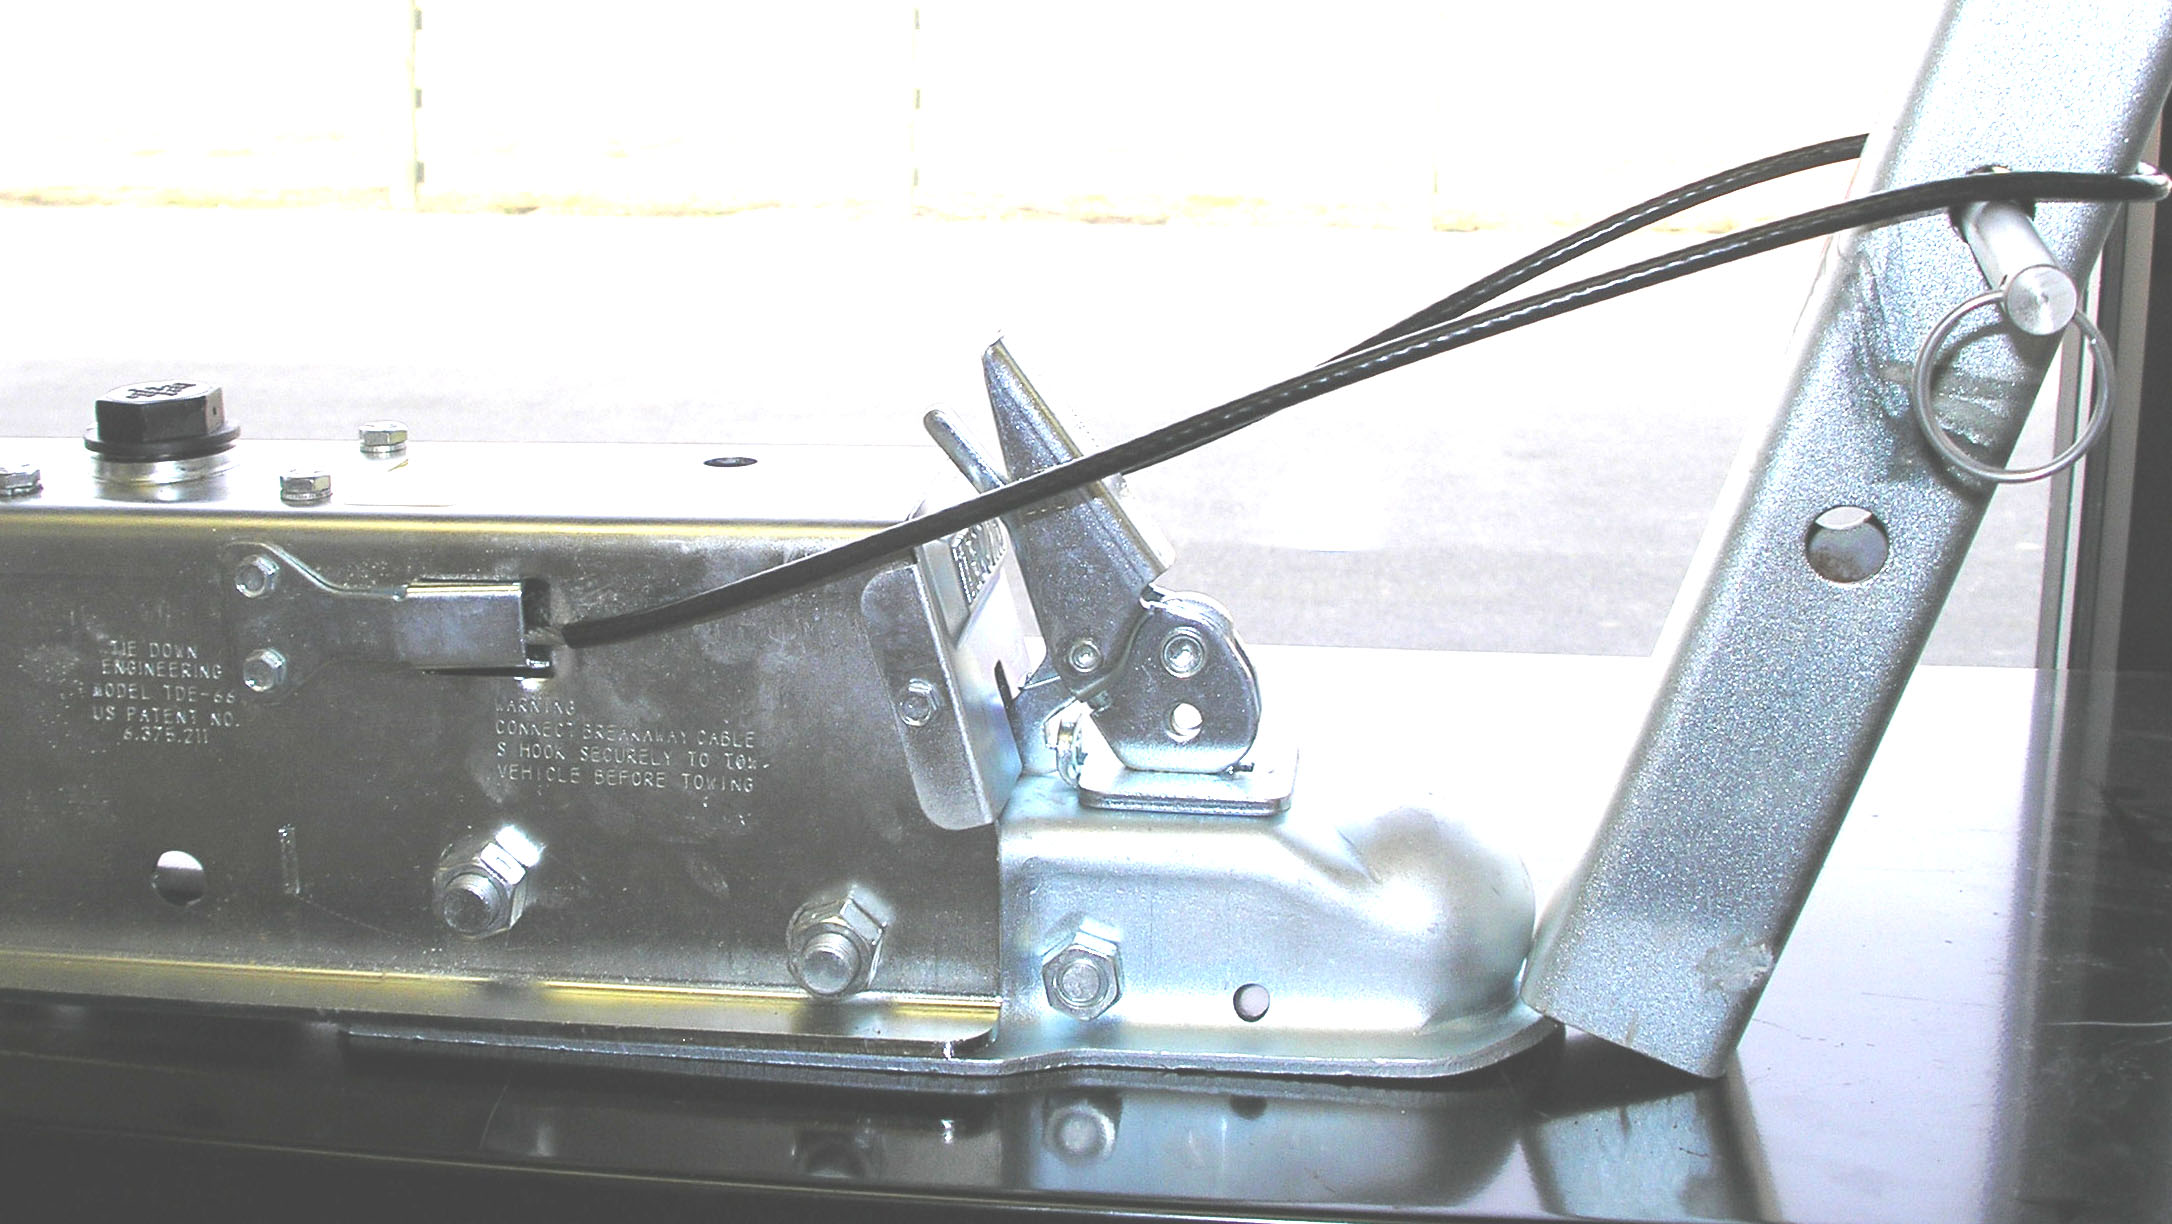
Emergency Breakaway Systems
Federal law requires all trailers to have a “breakaway” system. If your trailer ever came loose from the tow vehicle while underway, the breakaway system will activate the brakes on the trailer to slow it down & stop it-hopefully preventing an accident. The breakaway system usually consists of a cable or chain that is attached to the tow vehicle on one end, & a lever/latch assembly on the trailer surge actuator. Since the chain or cable is attached to the tow vehicle, if the trailer come loose from the truck the cable pulls the lever energizing the trailer brakes. A latch mechanism keeps the lever in the energized mode even if the breakaway chain or cable is ripped away by the separation of the truck & trailer. The lever mechanically pushes the master cylinder piston to generate emergency brake fluid pressure & the latch assures that the pressure is maintained until the latch is disengaged manually by using tools. The breakaway system can be helpful in performing tests & even for bleeding the brakes, so understand it & use it to help you keep your brakes in top shape. If you would like to look at specific surge brake related parts, please click here. We also feature a number of emergency breakaway parts for trailers.

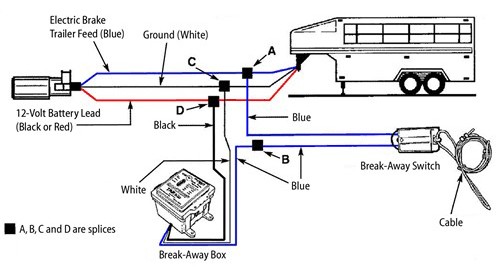
(Shown) One style of breakaway systems & a diagram on how it works.
–
TYPICAL SURGE BRAKE TROUBLESHOOTING PROBLEMS:
“Brakes Don’t Seem to Work At All”
First, do a test to see what’s going on. Find the breakaway chain or cable & pull it until it latches in the locked position. An easy way to do this is to find something that you can use as a lever. (See photo below)
Jack up all the tires & wheels that have brakes. Manually rotate the tires/wheels using your hands in the forward travel direction & see if they lock up. Check each wheel that has brakes, as it is possible for some of the brakes to work, but not all of them.
Important: The surge actuator slide must be pulled & pushed (full stroke) to create pressure & bleed air from system when making repairs or tests. The slide will offer resistance due to the orifice & shock absorbers, so expect to stroke it with effort. If you would like to look at specific surge brake related parts, please click here.
Got Brake Fluid?
If none of the brakes work, remove the master cylinder cap & look inside to see if there is any brake fluid in the reservoir. If not, we recommend you rebuild or replace the master cylinder & wheel cylinders. The absence of brake fluid-especially for any length of time allows rust to form in the entire system-including the steel brake line tubing. Rust is the enemy as it creates rough surfaces inside the wheel and master cylinder bores destroying the piston seals. Rust particles will also flow around with the brake fluid & eventually will plug up the orifice (see orifice photo). In some cases it is possible to hone the cylinder bores & replace the seals to rebuild them, but usually the bores are pitted beyond repair. Missing brake fluid means you have a leak. You must find the source of the leak & fix it. Don’t merely add brake fluid & go back on the road!
Inspect The Brakes at the Wheel
If brake fluid exists in the system, a process of elimination is needed to find why the brakes aren’t working. It is possible the brake shoes are worn completely out, or the drum brakes are greatly out of adjustment. We recommend you remove the brake drum & visually inspect the shoe linings. While the brake drum is off, have an assistant manually operate the brake system using the breakaway lever. Have them work the surge actuator from “off to on” & closely watch the wheel cylinder to see if the push rod is moving in & out. If not, the wheel cylinder may be frozen, or the master cylinder is not pumping, or the orifice may be clogged. Important: the surge actuator slide must be pulled & pushed (full stroke) to create pressure & bleed air from system when making repairs or tests. The slide will offer resistance due to the orifice and shock absorbers, so expect to stroke it with effort.
Inspect/Test the Master Cylinder
To test the master cylinder, remove the brake line or hose from the rear of the master cylinder located on the surge actuator. DO NOT remove the orifice fitting that the hose or brake line attaches to. This orifice is very, very small-perhaps as small as the diameter of one strand of hair on your head & can easily clog with debris. Engage the master cylinder using the lever to see if it forces a fine stream of brake fluid thru the orifice fitting. If not, remove the orifice fitting & then test it again by engaging the master cylinder. If it now pumps fluid, hold the orifice up to a strong source of light and see if you can see through it. If not, it is clogged & is preventing the brake fluid from reaching the wheel cylinders. Unclog or replace the orifice, reinstall it in the master cylinder, then test again. (If the clog is on the master cylinder side of the orifice fitting, it prevents pressurized brake fluid from operating the brakes. If the clog is on the wheel cylinder side of the orifice fitting, it creates problems when the brakes try to release because it prevents the flow of brake fluid back to the master cylinder reservoir). If the master cylinder won’t pump in all of these tests, it needs replacement. If the master cylinder does pump, proceed to the next step. (Note: it is possible for a master cylinder to pump fluid at a low pressure, but could have internal piston seal leakage that prevents it from building up adequate pressure to operate the trailer brakes.)
Test the Brake Line for Blockage
Remove the brake line from a wheel cylinder & have an assistant pump the master cylinder using the lever. Look at the end of the brake line you just disconnected. If brake fluid is being pumped thru the line, the master cylinder, orifice & brake line seem to be working, so assume the wheel cylinder(s) should be suspect at this point.
Bad Wheel Cylinder?
If you have proven the master cylinder is working, the orifice isn’t clogged, and the brake tubing is clear, the wheel cylinder should operate when the master cylinder is engaged using the lever. If it doesn’t, the wheel cylinder most likely has a frozen piston. Although you really can’t bench test the wheel cylinder, you can peel back & remove the rubber boot to look for rust or corrosion that would prove a stuck piston. If you have a stuck piston, replace the wheel cylinder with a new one. It’s a very inexpensive part.
“Brakes Work on Some Wheels, But Not on Others”
If the brakes work on even one wheel, it would indicate the master cylinder & orifice are okay. The wheels that don’t work will have one of the following problems that you’ve already learned how to test and fix:
- Frozen piston in wheel cylinder or disc caliper.
- Worn out or mis-adjusted brake linings.
- Blocked or kinked brake line tubing to that wheel.
- Leaking wheel cylinder that has brake shoes & drum soaked with brake fluid.
- Leaking wheel seal that has brake shoes & drum soaked with grease.
- Severely worn or glazed brake drum or rotor.
- Air in the fluid lines. (Bleeding required)
“Brakes Work in Reverse When You Don’t Want Them To”
The principle of surge brake operation says that the brakes will apply whenever the trailer “pushes” against the truck while in motion. The reverse side effect of this is that in reverse, the truck can “push” against the trailer also causing the brakes to apply. If for instance you were backing up on soft grass or mud, (or uphill) the trailer really doesn’t want to back up easily, but must be forced by the truck. This is enough to apply the trailer brakes. The harder you try to force the trailer, the harder the trailer brakes apply. Trailer surge brake manufacturers deal with this in different ways:
- Use “Free Backing” brake assemblies on the axle that allow the brakes to disengage only in reverse. This is the most common method.
- Use an electric solenoid valve that allows the brake fluid to bypass back to the reservoir while in reverse. The electric valve is wired to the reverse lights on the tow vehicle. This ensures the brakes only bypass in reverse. This is the second most common method, usually seen on boat trailers more than other types of trailers. This system usually uses a 5-pin flat plug trailer wiring connector instead of a standard 4-pin electrical connector.
- Use a mechanical pin to prevent the surge actuator from compressing & building up pressure. This pin is supposed to be used when backing up only, but if left installed can prevent the brakes from operating-even if traveling in forward. This is a very uncommon method.
- Use a manual valve that bypasses brake fluid to the reservoir. It requires the operator to manually open the bypass valve when in reverse, but to remember to close the valve before towing in forward motion. This is also a very uncommon method.
The following pictures show 2 common types of brake assemblies used on surge brake drum brakes. The photos should help you identify the type of brake system you have on your trailer. Some trailer axle manufacturers can accommodate converting from one type of brake system to another without major modifications. If you would like to look at specific surge brake related parts, please click here to visit our online parts section.
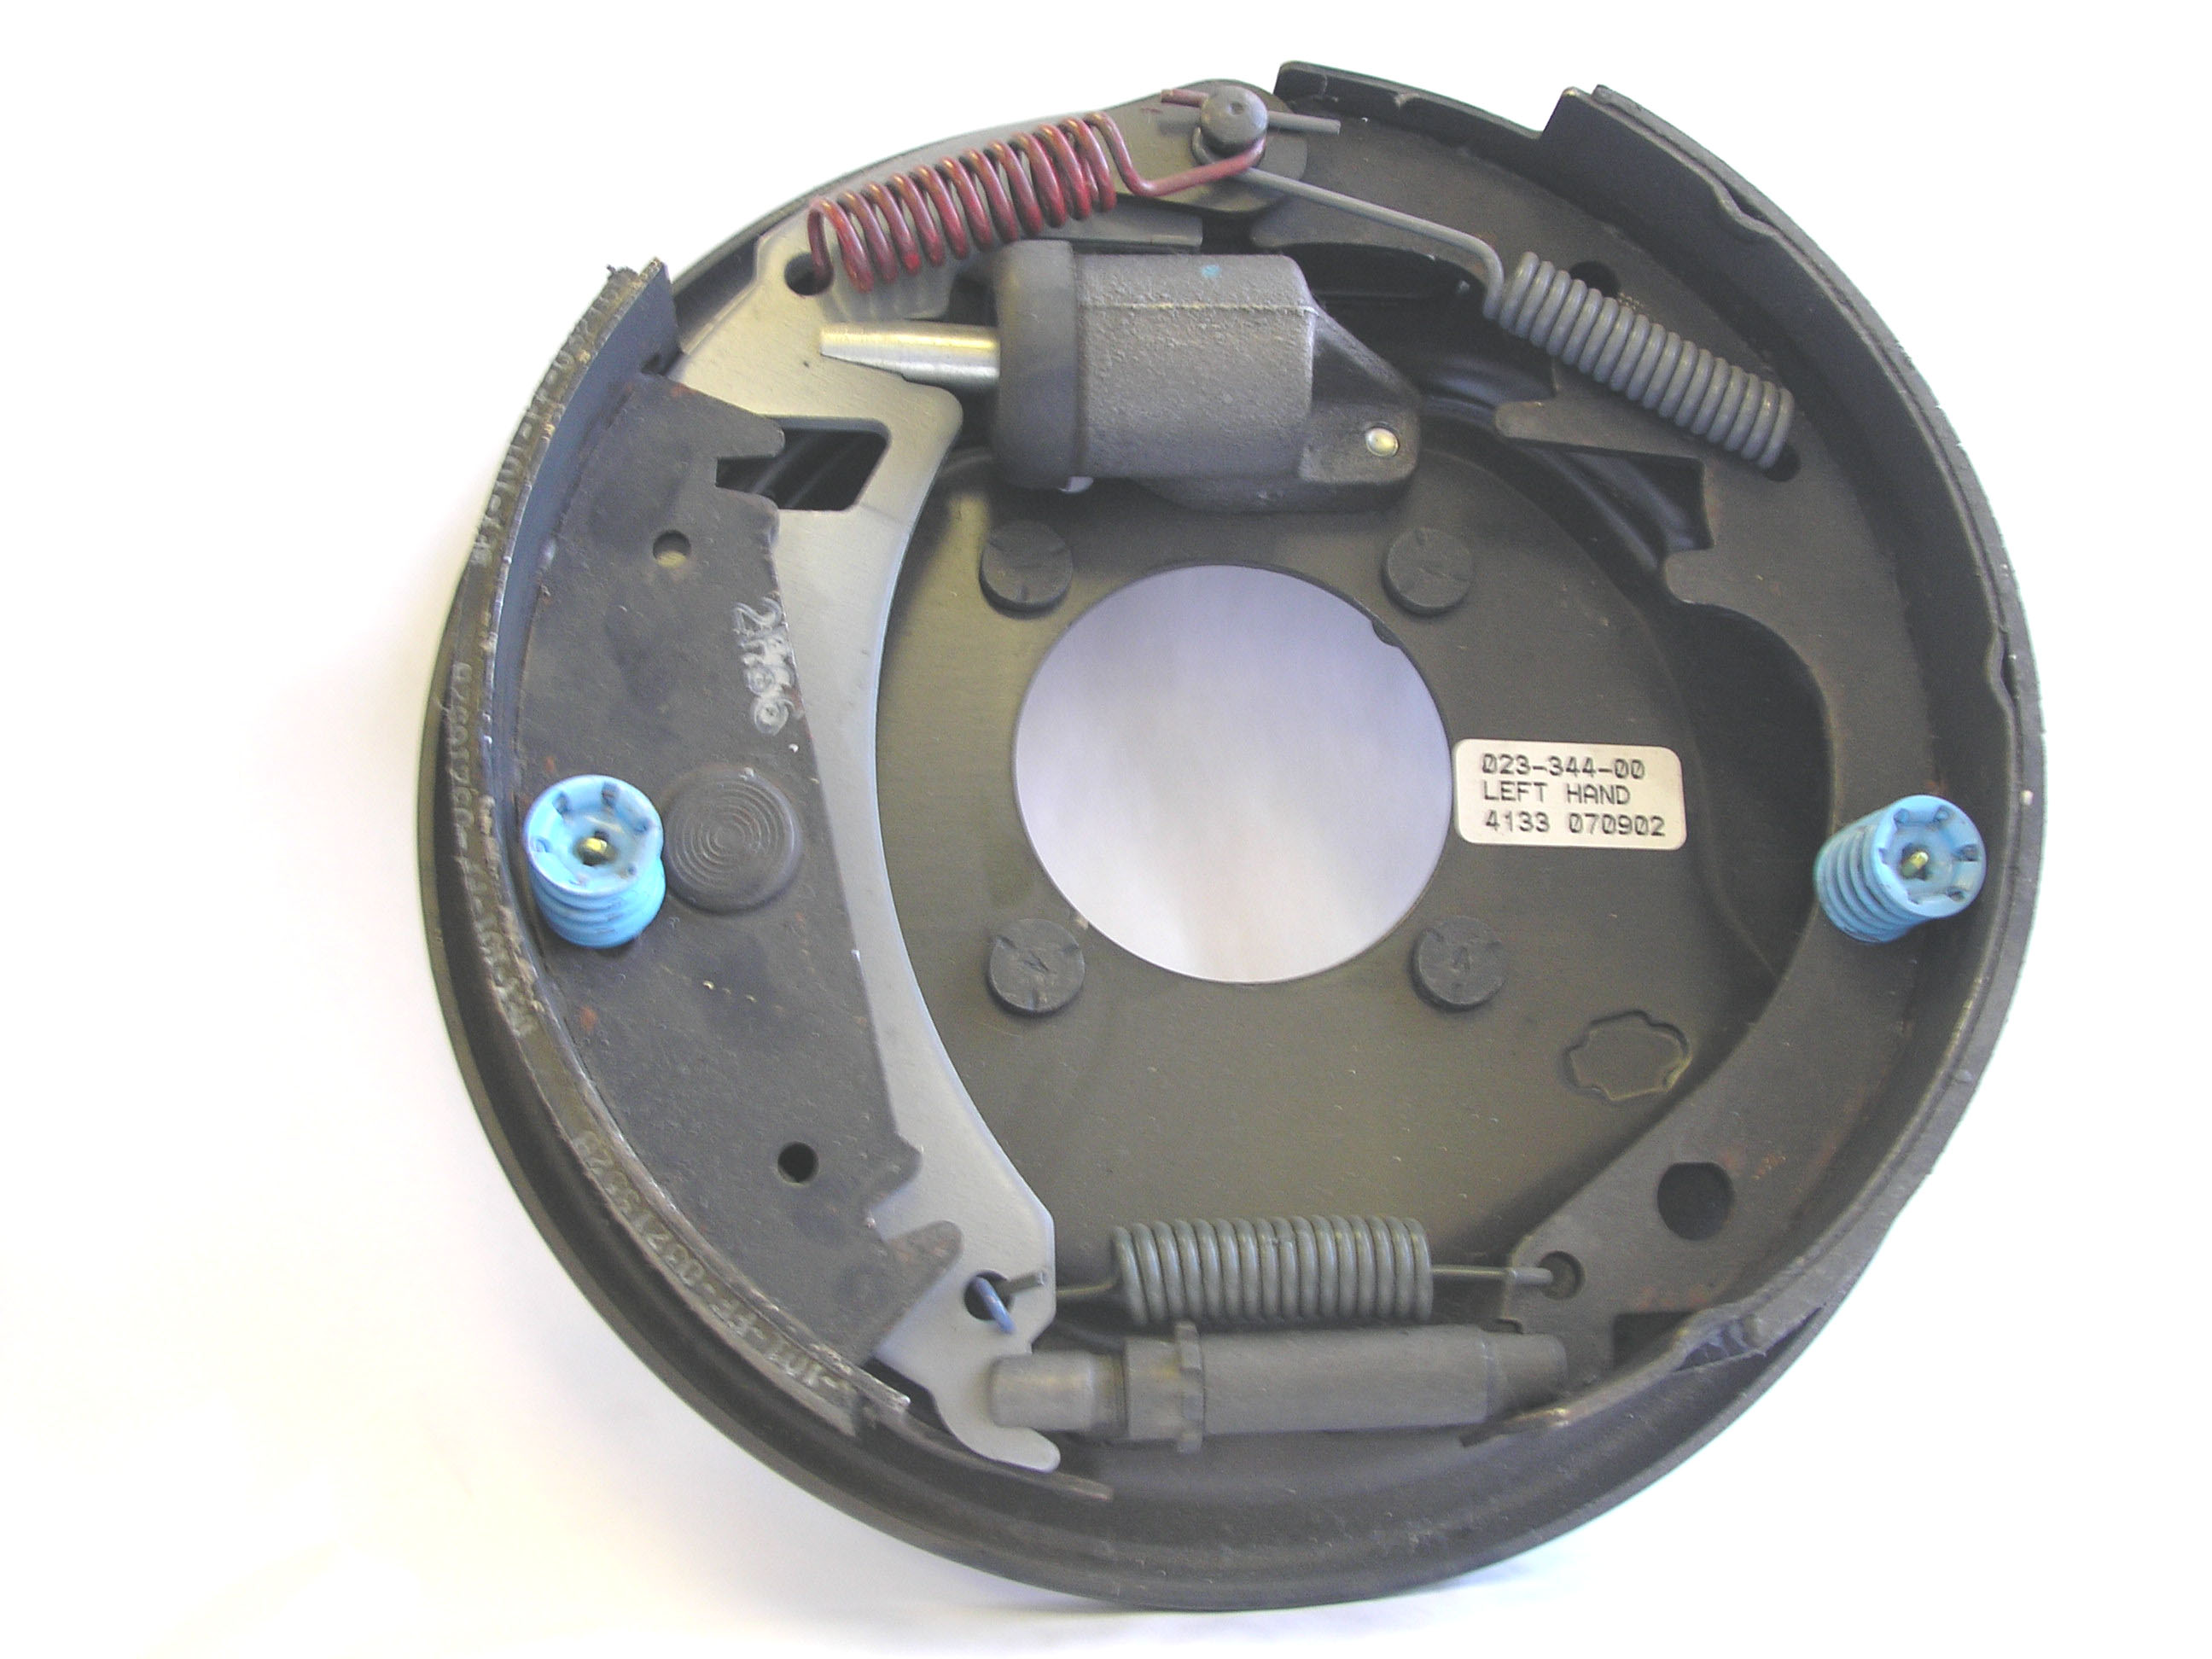
(Left) “Free Backing Brake Assembly || (Right) NON “Free Backing” Brake Assembly
“Brakes Won’t Release After A Sudden Stop”
This is not a very common problem, but it can occur. What causes this is the brake fluid pressure cannot release & travel back to the reservoir due to a mechanical or hydraulic problem. Check the following items to identify the problem.
- The orifice is clogged on the output side of the orifice. The clog is acting as a “check valve” allowing the fluid to come out of the fitting, but won’t let it go back in.
- The surge actuator slide assembly has mechanically jammed (stuck) in the compressed position & will not allow the master cylinder piston to return to it’s relaxed position-thus preventing the fluid from returning to the reservoir & releasing the brakes.
- The piston in the master cylinder is stuck in the compressed position preventing the internal return spring from pushing the piston to its “parked” position-allowing brake fluid to return to the reservoir & releasing the brakes.
- The steel push rod that pushes the master cylinder piston is adjusted too long or is bent & will not allow the master cylinder piston to return to it’s relaxed position-thus allowing the fluid to return to the reservoir and releasing the brakes.
Boat trailers in particular work in a very harsh environment. A boat trailer axle is literally submerged underwater when launching or loading a boat. Fresh water is bad enough, but salt water is extra tough on the brakes, bearings, seals, drums, rotors, etc. Purchase and install a “flush kit” on your drum brakes. This kit allows you to hook up a garden hose to the brakes and flush salt water out with clean tap water extending the life of the brakes and running gear on a boat trailer. Boat trailers don’t get used as much as other types of trailers, making them even more prone to brake problems due to rotted seals, corrosion, etc.
A very simple test to perform before you travel on a trip, or after the trailer has been sitting for awhile is to hook the trailer to you truck as you would normally. Energize the brakes while parked by pulling on the breakaway system cable or chain until it latches. Next, place the tow vehicle in gear, and begin to slowly drive forward. You should feel the trailer brakes working & offering very stiff resistance. Don’t forget to unlatch the breakaway system before using the trailer normally.
Follow these simple trouble shooting techniques to keep your trailer brakes working. You owe it to the others on the road with you.